Wednesday, July 1, 2009

The Art Of Stained Glass 101 - Copper Foiling


In this entry you are going to be learning how to apply copper foil to the pieces of glass that you just cut out from your pattern pieces. For this process you will need your roll of 7/32” black backed copper foil and a sharp straight edge. I find packages of straight edges at my local Dollar Store that are usually 5 for $1.00, but you can use any straight edge you have as long as it will cut the copper foil.

The next hi-tech tool I use is a crimper with a roller attached to it. There are several different brands on the market, I use a Foil Burnisher with Edge Smoother Handle from "Anything in Stained Glass". If you are just starting out and need to save your money for the more costly purchases stained glass has you can use half of a wooden clothes pin. Just remove the metal spring in the middle and you have one to use and a spare for later.

Hold your copper foil in your left hand, paper side up, foil side down. With the foil end pointing away from you peel the paper back about two inches, now take a piece of glass and turning it on its side center the last 1/4 inch of the end onto the copper foil and press it into the foil, then continue centering the copper foil down the next side of glass, pressing and peeling as you go. **Note: The first side of glass will only have the 1/4 inch piece of tape on it until you finish it as instructed below. This procedure ensures a complete circle of tape with no open ends.** Follow this process all the way around the glass until you get to your original 1/4 inch piece of copper foil. Once you get to the side you started on continue your copper foil down that side covering your original 1/4 inch piece of copper foil and taking the foil to the end of the piece of glass then use your straight edge to cut it even with the edge of the glass.

Once your copper foil has been cut take your burnisher or wooden clothes pin and burnish (softly rub) the edges of the glass all the way around. When completed, then take your crimper and run the groove of your crimper around your entire piece. If you only have a wooden clothes pin you will not be able to crimp; however, you can gently rub the edges of your piece (on both sides) with the clothes pin to help smooth the foil down for better coverage. Now lay your piece down flat and using the roller roll your edges flat on both sides. Don’t get sloppy on this step, when you hit it with a hot iron it will show here first!

Now it’s at this point that I always take a wooden clothes pin and gently burnish the edges down flatter. This helps with assuring they do not lift up once I start to solder. It’s taking time to do the small detail work now that will pay off in less headaches later on. Here's a video that will help with some of it.

That’s it for foiling your glass pieces. Was it as hard as you thought? Well next time we’ll begin our venture into soldering. We’ll start out with tinning, then move into tack soldering. So remember to keep your eye on the prize and keep thinking about all the beautiful things your going to make after you learn The Art Of Stained Glass 101!

Sunday, June 7, 2009

The Art Of Stained Glass 101 - Cutting Glass


Now that you have your work area set up, your pattern picked out and your glass chosen the next step is cutting out your pattern to attach it to your glass. You will be doing the first piece in the Tiffany style known as the “copper foil method” created by Louis Comfort Tiffany. Since you will be doing the copper foil method only, cut each piece out by cutting down the center of the patterns black line. If you were doing a leaded panel you would need to accommodate for the width of the lead, so the amount removed when cutting would be more. But that is something you don’t need to worry about until you start on a panel, and when you do, they have special scissors you can purchase for that. **Note: prior to cutting out any of your pieces number every piece in your pattern.

Now that you have all your pattern pieces cut, separate the pieces according to the color of glass. You should have the same number stacks of pattern pieces as you do colors of glass. Now pick a color of glass to begin with, take a few of your pattern pieces for that color and place them on the glass, with your black fine tip sharpie outline the entire piece and write the number of that piece on the inside of it. (Tip: Try using poster tack putty to hold down pattern pieces. A small amount in each corner will hold the pattern down even through mild grinding.) Do as many pieces as you can to fit your sheet of glass. For my beginning students I tell them to give themselves no less than 1 ½ inches of glass between pattern pieces. This allows for plenty of room for both sides of the pattern. As you become more experienced you can shorten that distance a little.

When placing the pieces onto the glass line them up so they form a straight line on the glass. Latter as you get more comfortable with stained glass you will start to place your pattern pieces in more specific ways to make certain pieces of glass stand out, but for now keeping them in a straight line will help make your life a lot easier! If all your pieces do not fit, DON’T FORCED THEM. Give yourself plenty of room around each piece. If you run out of glass and still have pieces left, get another piece of glass. If it is a small amount of glass that you need, maybe you could switch some of the pieces around with one of the other colors that didn’t require as much glass. Before running out to buy anymore glass see if there are any changes in the way you have your pattern colors set that you may be able to redo. This can save you valuable time and money, and the only time you can do it is NOW! Once you start cutting your glass you’ve pretty much made your commitment.

O.k. you’ve made it to the hand sweating, nerve racking, glass cutting part. Just remember on all stained glass the smoothest side is the side you cut on (sometimes it’s hard to tell), hold you cutter up so your cutting wheel is straight, make sure you keep your cutting wheel oiled (put oil in the reservoir if you have one that requires it), start cutting as close to the edge as possible without going over, stop cutting as close to the edge as possible without going over, keep even pressure on your cutter throughout the entire cutting process, do not go back over your score line once you have scored it, do not press too hard when cutting, you should hear a low hissing sound. Watch these to help you out! How to cut glass, straight lines, curves and circles.

First start cutting your pieces out in strips or rows. Once this is done, cut them out individually. Take your time. If you do break a piece, then pull that pattern piece to the side, and once you have all the pieces cut you can go back and recut that one. Take your individual pieces and cut each one of them along the black line you drew with your sharpie.

Now you should have all your pattern pieces cut out! How was it? Below is the complete process in a list format to help you remember more easily. It is always easier to practice on clear window glass before you use your expensive stained glass. (Tip: Usually frame shops, galleries, or any type home décor shop will have a framing department that has salvage glass to get rid of. Plus there is a lot of salvage glass in dumpsters behind window and door shops. Be creative, look for it, it’s out there!)

Number pattern
Cut pattern
Outline pattern on glass
Practice cutting on clear glass first
Cut glass out in strips first
Cut glass out in individual pieces
Cut glass out along black lines

With each piece cut they are going to be very sharp on the outer edges so handle them with care. You should grind each piece now then you’ll be ready for the next entry when I’ll tell you how to apply the copper foil. Have fun and keep thinking of all the new gifts you can make after you get this one made!

Sunday, May 31, 2009

The Art Of Stained Glass 101 - Supplies


In our last entry we went over a quick, but very complete list of everything you will need to get started in your venture into stained glass. Now in this entry I'll list the supplies you'll need in order to get yourself organized and started in the wonderful world of stained glass!

The first thing to do is to decide on a pattern. For my students I always have a selection of easy starter patterns for them to choose from. If you go here you will find a site that has three simple and easy patterns for you to choose from. Any one of these would be a great pattern to start with because of the small number of pieces required and the low level of difficulty involved.

The second thing you will need to do is choose the glass for your pattern, about 2 to 2 1/2 sq. ft. Stay simple. There's time enough later for you to become bold and brave with your glass and color choices. This is the time you need to stay simple and learn the basics of how to use your tools and cut the glass. So remember that old "kiss" saying, "keep it simple stupid!"

The next items you will need are a roll of 7/32" black backed copper foil, a 1 lb spool of 60/40 solder, and water soluble flux for stained glass. There are several different varieties of each on the market, each with their own pro's and con's. The only one I am really a stickler about is the flux. I prefer to use Novacan Old Masters Flux because I've had better results with it in the past. But since I haven't tried every single one on the market, I can't say you won't find another one you like better.

The last items you will need to get will be the patina, that is if you intend to blacken your piece, and the polish to shine it to a beautiful black/bronze shine. These two items are like the icing on the cake in my book. They are the finishing details that make stained glass so beautiful.

Now your ready to start setting up your work surface and cutting your pattern out next. On your work table keep a supply of fine tipped black sharpies and silver sharpies along with a white and black china marker. These are for your glass later on. I keep a large spray bottle of alcohol and a roll of paper towel on my table that I use to clean my glass with and disinfect any cuts I may get immediately. Band aids are just the nature of the beast when you work with glass, so keep plenty of them on hand too.

So with scissors in hand I'll see you for our next entry to start cutting out your pattern. Oh, and if your wondering who's stained glass panel that is in the picture, well that's my first piece of stained glass I did over 25 years ago. My how time does fly!

The Art of Stained Glass 101

I can't tell you how many times I have been asked the question, "What equipment do I need to make stained glass with?" Well in this entry I will cover all the basic tools you will need to buy, in order to get you started on your way to making beginner stained glass.

The first thing is a good soldering iron. I recommend a 100 Watt Weller soldering iron as a good beginner iron, however, there are many others that are equally as good.

The second is a good oil glass cutter. I use a pistol grip glass cutter because the grip helps with the arthritis in my hands, however, a good pencil grip would do just as good.

Next, you will need a good grinder. I use an Inland grinder with a 3/4" grinding bit. Again, there are many other grinders on the market that are equally as good, so take your time and find one that you are happy with, it is a small investment.

Lastly, you will need a good pair of glass breaking pliers. There are plastic ones and there are metal ones. I have used both and honestly I have seen a difference in certain brands. So I would suggest going with the metal pliers, or spend some extra money and getting good, higher quality plastic pliers.

There you now have your tools, my next entry will cover your supplies. Come on, you can do it, before you know it you'll have a beautiful window created just like the one above. You'll be creating stained glass for your soul!

Sunday, April 26, 2009

A Sneak Peak


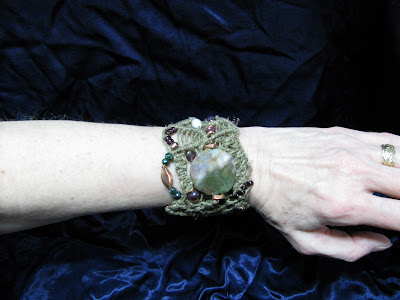
I've been doing several new things lately that I plan on getting on the site eventually, but since I just finished one of my favorite ones a couple days ago I can't stop going back and trying it on. Already I've had many compliments on how "cool" it is. So I thought I would give you a little sneak peak at a new line of macrame' bracelets I will be doing. They will be called "Dream Catcher Cuffs" and each will be truly one of a kind, because as you can see, there is absolutely no way any two could possibly alike! They will be coming soon, as soon as I can dream them up!

Thursday, April 23, 2009

Do You Use ReUsed In Your Jewelry Making?

I didn't start doing jewelry until after I got out of the Navy in 1999. I started out with my first love, stained glass. Once I had my stained glass studio up and running then I experimented with some jewelry ideas, and that's when the jewelry just fell into place. It was a natural progression.

I loved finding anything unique to work with, stone, wire, bottles, and nuts and bolts...just anything! You name it; my motto is "I can do something with that!” I am always storing things around the house just waiting for the right project to use them on. My husband is always threatening to throw them out, but never does. It's fun to go through the hardware drawer and just look for items that I think I might be able to use. The items that I have collected have come in very handy in my designs.

I also collect and recycle electrical wire, copper pipes, drapery cords, belts, and various metals. All electrical wire can have the rubber coating removed leaving you with workable wire. Sometimes you get lucky and the look and color of the metal is enhanced by the rust or discoloration on the surface. Copper pipes can be used in both jewelry and stained glass for various purposes, as can be numerous other recycled metals that otherwise would be thrown away. Cording can be reused as necklace or bracelet cording or braided into macrame'.

Once I realized the beauty and versatility of using recycled items along with my precious stones and stained glass I never turned back. It was like a new world of creativity had opened up for me. I have always believed that if you can recycle something, then do. Mother Nature is the first and our best recycler, so we should all heed a lesson from the teacher herself! Reuse every chance you get, because you may not get that chance again.

Friday, April 10, 2009

Are You Sick Of Winter?

If your as sick of winter as I am then join me in this last bon voyage to that cold, wet and sometimes white stuff. This is a short adiós to Winter and hopefully a fast, hurry up and get here to Summer!

For all of us who have ever wondered, is there really a winter wonderland out there. Well folks, yes there is. Hyde Park, London is the location of the "official" winter wonderland. The official winter wonderland website is here. So go there and check it out!

Did you know that the tallest icebergs tower over the surface of the ocean at a height corresponding to a 15-storey building, while the smallest are only about the size of a hut. This was only too true for my husband and I while we were in the Navy and stationed in Gander, Newfoundland, Canada and had the pleasure of seeing some of the most beautiful icebergs. These icebergs came from Greenland, and we were told, occasionally a polar bear would get trapped on them as they broke away from the mainland and floated down to Newfoundland. When the iceberg would get close enough for the bear to get on dry land it would get off and stroll into town looking for food and a place to relax at the local McDonald's dumpster. The RCMP's (Royal Canadian Mounted Police) would eventually tranquilize and transport him (or her) back up into the Labrador area where it is much colder and hopefully much more appealing to them. What a beautiful country it is up there! For some great photos of icebergs of Greenland and other areas click here. If you would like to see some information and photos on Gander, Newfoundland, Canada click here.

That's it I'm done. Hope your Spring is sprung!

Saturday, February 21, 2009

How Do You Like Our New Digs?

Sometimes you just have to dust off the old stuff and rearrange it to see what you have. Yes, it's the same stuff on the walls still, but just wait! We haven't got around to rearranging the pictures yet, so cut us a break, moving into new digs aren't easy. You need to take your time, hire a decorator, ask a lot of "what do I do with this" questions. We're still at the take your time step, so paleezzze cut us a little slack (there's a lot of boxes to unpack!). In the meantime, how do you like the new wall color I choose? I did get that done! Plus, I'll be sending some new designs in soon (like in 24-48 hours), so you can see what I have been really working on. So don't sweat the small stuff guys, life is too short! See Ya!

Friday, February 13, 2009

I Promised I'd Be Better In 2009!

I started off with a bang, but the bang went down hill fast this past week. On Saturday I must have come in contact with some nasty little creature of a germ that has taken out some horrible revenge on me this past week. I am still not over the little monster yet, but after going to the doctor on Tuesday and getting the necessary pills to combat the beast, I am confidant that day will be here soon.

Monday, February 9, 2009

I Was Out Shopping On The Internet Last Night...

Now that's a phase we wouldn't have heard much of twenty years ago. But today it seems it is a pretty common thing to hear. I wonder, do a large part of those who shop and buy end up buying handmade items made by artists like you and me? Are those shoppers aware that they can buy beautiful, handcrafted, reasonably priced quality gifts directly from the artist?

Today I came across a site that is working hard to inform shoppers all over the Internet to BUY HANDMADE! The site tryhandmade.com is one worth checking out and passing on to your friends and family. This truly is the time of the starving artist, so pass it on and help support one or two.

Tuesday, January 27, 2009